
Now that Netlify’s support for Functions and Forms is officially out of beta, we can all enjoy using them to add all sorts of capabilities to our JAMstack sites. Once you start exploring what can be done by using theses features, your imagination can really go wild, but its useful to first understand what they are and how you can use them.
This post looks at an example I built to show how you can use these capabilities to create a URL shortener for your own domain.
Why would you want a URL shortener?
There are lots of URL shorteners out there. Chances are you’ve used one in the past in order to turn some long, unfriendly looking URL into something memorable or short enough to type, dictate, or just for an easier copy and paste.
Well, this is another one of those. But instead of it being hosted by somebody else, this is an example of one that you could host for yourself.
Most of the time, the existing solutions are just fine. There are many to choose from — https://tinyurl.com, https://is.gd, https://bit.ly, https://goo.gl and more. Some offer more features than others, with things like custom short codes and analytics. But all of them depend on a third-party service. They also all introduce an extra database query and DNS hop to the journey made when following a link. And, they typically create links which are not related to your own domain, which could be a nice facility to have.
This example is partly me just scratching an itch to have my own URL shortener which does not depend on an external service. I want the ability to easily make my own short URLs which won’t go dead if some service outside of my control gets retired. I also want to be able to have recognizable, branded URLs on my own domain.
What does this implementation give me?
The result will be a tool to quickly create new short URLs based on my own domain. It will have a simple interface so that I don’t need to touch any code to create new short URLs.
You can see what the end results look like and give the URL shortener a whirl on this demo site. But remember, this is a demo, so the links you create there might not last forever.
https://linkylinky.netlify.com
If you’d rather go further with your experimentation, and deploy your own version to play with, you can do that with just a couple of clicks.
Try it: Deploy your own version to Netlify (for free)
How does this work?
With this new URL shortener site, I’ve been automating something I’d been doing manually for some time. During conference talks I often include a link to my slides or other resources. I like the link to be meaningful and short to help people find their way to a URL that’s too long to jot down during a talk.

To create this short link on my own domain I have been using a feature provided by Netlify, where I host my site. Netlify lets you specify redirect rules via a configuration file in your site’s code. You can use either a _redirects file, or add the configuration to Netlify’s global config file: netlify.toml.
For my own website, I prefer to use the netlify.toml option. The entry I added to create the short URL above looked like this:
[[redirects]]
  from = "/talks/smashing"
  to = "https://speakerdeck.com/philhawksworth/next-wave-infrastructure"
  status = 302
These configurations have an effect on how traffic to your site is routed by Netlify’s CDN. I’ll not go into details of this here as I’ve mentioned it before. You can also get more detailed information directly from the docs.
The key here though, is that this configuration sets up redirect rules which happen right on the CDN edge nodes. Traffic is not hitting a server or querying a database which I have to maintain or manage. It all happens at the node geographically closest to the site visitor, so it’s fast and resilient.
My website is already generated by a static site generator. From here it feels like a short hop to have my build also generate the redirect rules for me and allow me to automate the process with a handy little UI.
That’s what I’ve done. LinkyLinky is an example of that, free from the noise of the rest of my blog.
Step by step
1. Submitting new URLs to a form
I want to be able to submit a new destination URL and receive a new shortcode URL in return. This is a static website so I don’t have a server to handle post requests, but thankfully there are several services around the JAMstack ecosystem which can offer form handling as a service. Netlify has a form handling built in, so I’ll just use that.
2. Generating the_redirects configuration
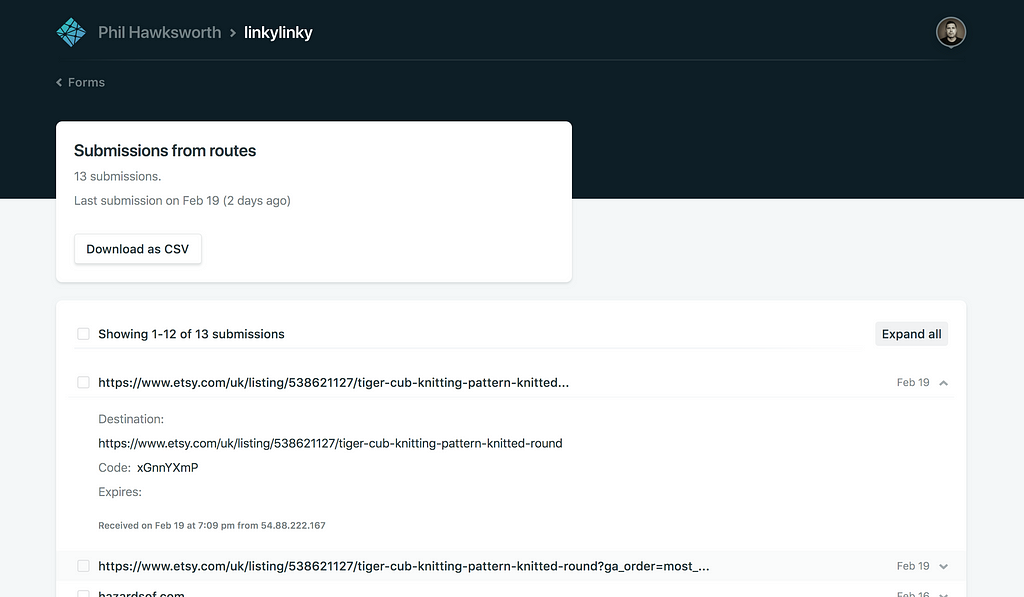
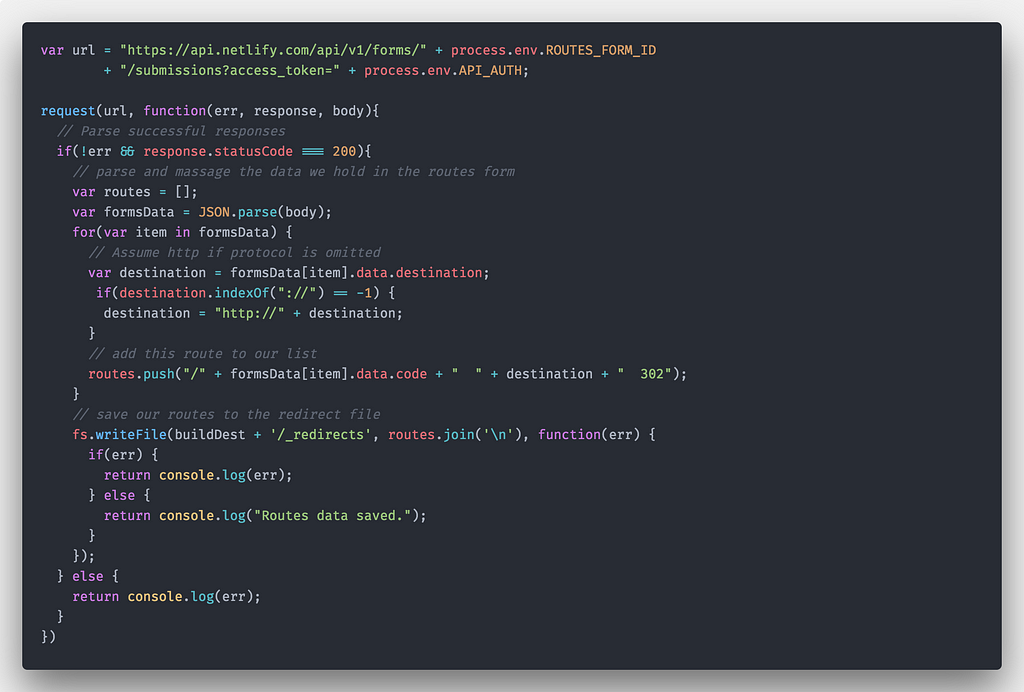
Since the submissions collected by Netlify’s Forms are also available programmatically via an API, I can grab them when I run my build to use when populating the configuration file.
This gives me an updated _redirects file for my site deployed to the CDN whenever my build runs, which looks a little like this:
/66XXMgJR  https://news.bbc.co.uk  302
/MjwwEm0G  https://paper.dropbox.com/  302
/nZxxzDkD  https://www.whosampled.com/Dorothy-Ashby/sampled/  302
/j2ZZ0r2z  https://twitter.com/i/notifications  302
...
3. Adding some intelligence with Lambdas
At this stage I have the basics of a working solution, but until I add some more logic, it’s not something I could confidently use. So far, the redirect rules generated are entirely based on the information posted to the form. That’s fine, but it doesn’t automatically create a shortcode for me. Nor does it avoid duplication of destination URLs or shortcodes. To do that, I’ll need the ability to introduce some logic at the time when the user is asking for a new redirect rule.
This is the perfect example of a something that can be achieved by using an AWS Lambda function, or similar Function-as-a-Service function from another provider like Google Cloud or Microsoft Azure.
Happily, Netlify now makes the development of AWS Lambda functions trivially easy thanks to Netlify Functions. There is great documentation and guidance on how to use Netlify Functions so I’ll skip to describing what my functions do.
Rather than posting my form data directly to the Netlify form handlers, I use JavaScript to post the request for a new short url to a function I created called generate-route. When this function is invoked via an HTTP request it can:
- Sanitize the submitted URL to ensure it includes a protocol and is well formed
- Generate a unique shortcode
- Ensure that this new entry would not create a duplicate in our _redirects file
- Post the massaged data to my routes form
- Return a message to the UI to tell the user what their new URL will be
With the nicely formatted data posted to my form, I pick up where I was before, triggering a build and deployment automatically.
Meanwhile, I’ve told the user what their new URL will be.
One of the many benefits of using Netlify Functions to create and manage Lambdas is that this code is all managed and deployed from within the codebase of a site. No fiddly separate development workflows or deployment processes to update my Lambda functions for me. You can see this function in a bit more detail if you take a look at it in my site repo.
4. Shortcutting the build time by accessing the Forms API directly
Once small problem is still lingering.
The new redirect will not be active until my build and deployment to the CDN completes. For this project, that process is averaging around 25 seconds, which is nice and fast for a site build and deployment, but an eternity for a user to resist the temptation to click on the shiny new link that I just gave them.
I’ll need to make that work for them even before the build completes.
And I can do that by cheating.
Although the build takes a few seconds, the data posted to the form is available instantly via the API. I am already calling that API during the build process. If I called the same API directly from the client via JavaScript, it could look up the new route and then redirect the user to the correct destination URL right away. No more waiting for the build to finish.
Once again, this is a great moment to use a Lambda function. On this occasion the get-route Lambda function acts a bit of middleware to proxy requests from the browser to the form submission API.
To see what that function returns you can try calling it by following the link below. It should tell you were a given shortcode will resolve to.
https://linkylinky.netlify.com/.netlify/functions/get-route?code=wjVZ9GXX
Here’s why this is preferable to just hitting the API directly from the browser:
- Calls to the form submissions API need to be authenticated. I don’t want to expose my auth token by including it in the code or show it in requests made from the client to the API. I’ll keep that between the Lambda and the API thanks to Netlify’s support for environment variables
- The form submissions API only gives us basic access to the submissions content. I need somewhere to run the logic to search for the URL which corresponds to a given shortcode. That lookup happens in this Lambda function.
Combining these pieces gives me just what I need. Now I can quickly make new short urls on my own domain without any fuss.
Big opportunities from common building blocks
This is only a proof of concept, but it is already useful for me. I’ll most likely add a few enhancements like the ability to provide a specific, meaningful shortcode rather than have the system generate a random one for me. And perhaps I might sometimes want short urls as a temporary resource, so an option to have my short urls expire after a given time could be handy.
With these building blocks there are all sorts of possibilities. The simple API I’ve created could be called from anything that speaks HTTP. Perhaps I’ll make it available through a Slack integration or and Alfred App action
Access to utilize APIs, trigger automated build processes via incoming webhooks, post to external webhooks, and execute Lambda functions, all combine to create so many possibilities. My imagination is bristling with ideas of things I could make from what are seemingly simple building blocks.
(This slightly expanded version was originally posted on Netlify’s blog)
Creating your own URL shortener with Netlify Forms and Functions was originally published in Netlify on Medium, where people are continuing the conversation by highlighting and responding to this story.